

Over the years, I have purchased many different watering wands from various places. It doesn't seem to matter where you buy them, Lowe's, Home Depot, Walmart, Kmart (if you can find one, I miss me a good blue light special), they are all of the same design and quality ---CRAP!
They don't even last through a whole season, and I have had some fail after only a couple of months. Let's take a look at one:
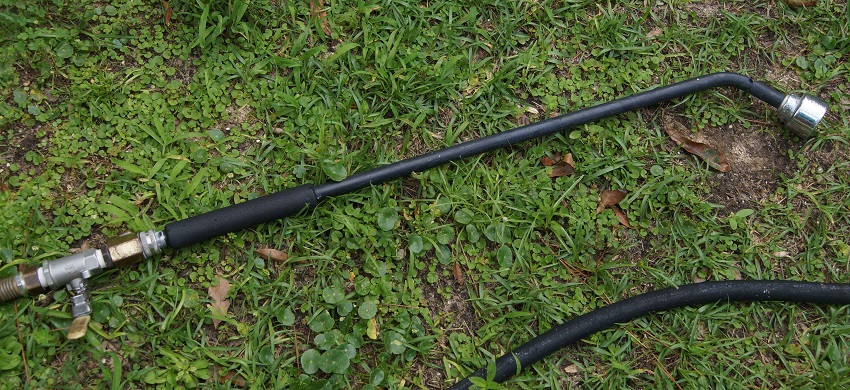
Nothing fancy, just your standard wand, this one came from Lowe's and I think it cost $14.95. I purchased it in February and it is already malfunctioning. I get more water on my pants and down my leg than on my trees. They all break at the same place, where the aluminum wand attaches to the fitting that holds to the valve. Here it is close up:

The wand is made of cheap, thin-walled, aluminum tubing that is flared on the end and mates to the valve and gasket. The weight of the water in the wand causes the top of the fitting to start creasing the tubing and eventually it will deform enough where it won't seal, no matter how much you tighten it.
But wait, there's more, they have even gotten poorer in quality. The previous ones that I purchased had aluminum spray heads, it and the valve were the only thing worth saving when you threw them away. The latest purchased came with a "pot metal" head with a light chrome plating. These start to corrode very quickly. Take a look:


So, tired of wasting my money on overpriced Chinese junk, I decided to find a better quality wand, one that would hopefully last at least a few years. I searched the internet and came across a few, even one that was very pricey and supposedly made of brass. I could not really find anything that looked like it would last and, for the asking price of some of them I would like to hold it in my hand and check out the quality.
Being kinda handy and frugal (some say I am cheap), I decided that it shouldn't be too hard to make my own. There are various examples of home made wands on the internet, made from copper, PVC, or even galvanize d pipe. I expect that the last material would be quite heavy. After looking at the various construction techniques, I came up with my own plan using three-quarter inch copper pipe. Here is a picture of the materials and list of what you will need:
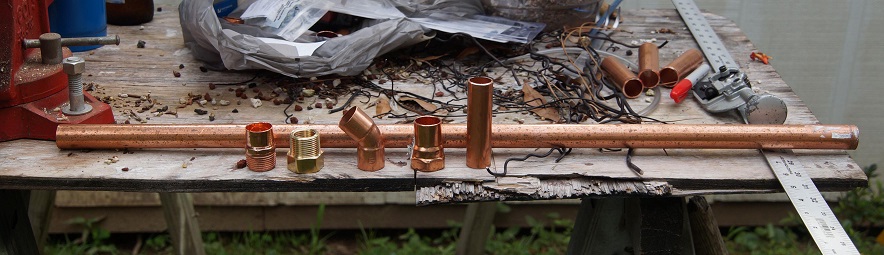
List of Materials (I got my stuff at Lowe's):
¾ inch copper pipe -- sold in various lengths, the ten foot stick is most economical and since I planned on making four anyway, I went with it
¾ inch copper male adapter
¾ inch copper female adapter
¾ inch copper 45 degree elbow
¾ inch male pipe to female hose adapter -- it is the brass fitting in the picture, could not find it in copper
Soldering torch
Solder
Flux
Wire plumber's brush or emery cloth
Tubing cutter or hacksaw
Vise or something to hold the pipe while you solder
Spryer head -- I used the old ones from previous wands that I have owned, Dram makes some nice ones that aren't too pricy. You can find them on the internet.
Valve -- I used and old one, again salvaged from one of the dead wands. The same valve is available at Lowe's, they can be found where the water hoses are. Or, if you don't want to control the flow, leave it off. I recommend it, though, it is nice to be able to cut back when watering delicate plants.
First start by cutting the pipe to the length of the wand that you want to make, keeping in mind that you will have a little extra length form the extension past the 45 degree elbow that holds the sprayer head. I made mine about thirty inches overall. You will also need a short piece about three to four inches to connect the elbow to the male adapter for the sprayer head.
Next, you will want to clean all of the areas to be soldered so that the solder will stick well. Use the plumber's brush or emery cloth, I used the emery cloth.


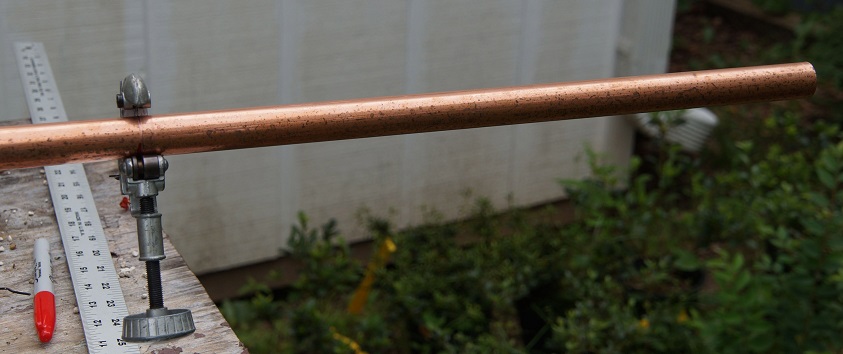
Put the pipe in the vise to secure it, not tight enough to scar or crush it, just enough force to keep it steady. I wrapped mine in a towel to help protect it. If you don't have a vise, use some means to secure it, it will be too hot to handle while soldering. Now test fit the pieces together to make sure all of the fittings will slide all of the way onto the pipe, it not, sand or brush some more until they do. Once satisfied with the fit, coat the joints with the flux paste and reassemble . The flux helps the solder wick into the joint and really get a good join. Make sure that you have the female adapter on the end where the hose will attach and the male adapter on the end that the spray head will attach, don't ask me how I know this.


Now it is time for fire! Nothing cooler than a blow torch! Well, unless you burn yourself.
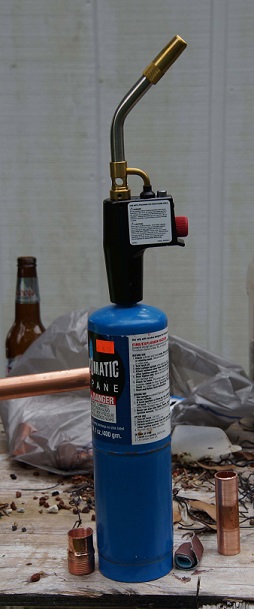
I used this one from Benzomatic, it is not to pricy, has auto ignition, and can use propane or mapp gas. I did not get any pictures of the actual soldering, didn't have enough hands and holding the torch with my mouth did not seem like a good idea, but will offer a few tips. First, go slow, don't rush the process. Heat the pipe at the joint and touch the solder to the pipe to melt it, don't melt with the torch. You want the pipe to be hot enough so that when the solder melts, it is drawn into the joint. With a little practice, you will find it to be quite easy. One note, make sure that the end with the male adaptor is pointing slightly up so that the excess solder won't run down into the threads, don't ask me how I know this either. When you are done, you should have something like this:

It is not the prettiest solder job, I don't so this professionally, but it is highly functional. Function over form, I say. Now, after it cools, screw the sprayer head on the male end. You could put another hose adaptor on this end as the threads aren't exactly the same. However, since the head has a gasket in it the threads are long enough to allow the wand to engage the gasket.

Next we have to put the hose adaptor on the female end. This is what it looks like:


One end screws into the female end, I applied some Teflon tape to make sure I get a good seal. The other end screws onto your hose or the ball valve that you got to control the flow.

Not bad for and afternoon project, I made four in one session, three for me and a shorter one for my dad. So far, after about a month of use, they seem to be working very nicely and should last a long time. One thing to note, the copper is a little heavier on the thirty inchers, not too heavy, but there is a noticeable difference. You could use half-inch tubing to trim some weight. Just remember that the fittings on the ends will have to be ½ inch tube to ¾ inch pipe so you can still screw the sprayer and the hose to it. Oh, and after you get it all put together, run some water through it to wash any flux that may have leaked inside after soldering.
Now, go water something!
